


Introduction
Redux is a predictable state container designed to help you write JavaScript apps that behave consistently across client, server, and native environments and are easy to test. While it’s mostly used as a state management tool with React, you can use it with any other JavaScript framework or library. It’s lightweight at 2KB (including dependencies), so you don’t have to worry about it making your application’s asset size bigger. With Redux, the state of your application is kept in a store, and each component can access any state that it needs from this store.
For this reason, many projects that use Next.js want to take advantage of Redux as well. But using Redux in a Next application has a few catches, and the setup is not always straightforward. That’s why this article will walk you through how we can set up a Next project with Redux.
Let’s add redux to next app with these 7 easy steps
1. Creating Next app and installing the dependencies
Here I am using a tailwind typescript starter pack to create a next app.
npx create-next-app -e with-tailwindcss nextjs-redux-app
For Installing Redux toolkit and React-redux, I will be using yarn instead of npm in this project.
yarn add @reduxjs/toolkit react-redux
2. Creating a Redux Store
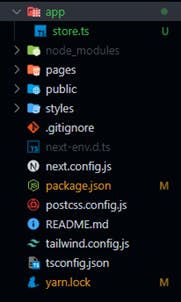
First we will create a file named app/store.ts as shown in the picture below
Store.ts will have the following content (boilerplate code).
 import { configureStore } from "@reduxjs/toolkit";

 export const store = configureStore({
   reducer: {},
 });

 // Infer the `RootState` and `AppDispatch` types from the store itself
 export type RootState = ReturnType<typeof store.getState>;
 // Inferred type: {posts: PostsState, comments: CommentsState, users:
 // UsersState}
 export type AppDispatch = typeof store.dispatch;
3. Wrapping app in a redux provider
Now we will wrap our app with the redux provider so to provide the store for our app. For this we need to import our store and provider form react-redux as shown below.
The content of pages/_app.tsx will look like this.
 import "../styles/globals.css";
 import type { AppProps } from "next/app";
 import { store } from "../app/store";
 import { Provider } from "react-redux";

 function MyApp({ Component, pageProps }: AppProps) {
   return (
     <Provider store={store}>
       <Component {...pageProps} />
     </Provider>
   );
 }

 export default MyApp;
4. Now we will create a redux slice
We are making a simple counter app in this tutorial so for this create a file named slices/counterSlice.ts. I have explained each line using comments to get a gist of what is happening here.
 import { createSlice } from "@reduxjs/toolkit";

 // It is a typescript definition for our initial state
 // We can use type or interface here, it's up to our preference
 export interface CounterState {
   value: number;
 }

 // Defining the initial state
 const initialState: CounterState = {
   value: 0,
 };

 // We will use the createSlice function form redux toolkit
 export const counterSlice = createSlice({
   // We can name it anything according to our preference
   name: "counter",

   // Initial state
   initialState,

   // These are basically the actions or function which
   // we are gonna call from our code to manipulate the
   // values located in these different slices at that
   //global data layer
   reducers: {
     increment: (state) => {
       state.value += 1;
     },
     decrement: (state) => {
       state.value -= 1;
     },
   },
 });

 // We are exporting these two different functions
 // so that we can call it form the outside
 export const { increment, decrement } = counterSlice.actions;

 // Exporting the counterSlice reducer so that we can connect it to the store
 export default counterSlice.reducer;
5. Importing Counter Slice to the store
Next, we need to import the reducer function from the counter slice and add it to our store. By defining a field inside the reducer parameter, we tell the store to use this slice reducer function to handle all updates to that state.
Now the updated store.ts will look like this
 import { configureStore } from "@reduxjs/toolkit";
 import counterReducer from "../slices/counterSlice";

 export const store = configureStore({
   reducer: {
     counter: counterReducer,
   },
 });

 // Infer the `RootState` and `AppDispatch` types from the store itself
 export type RootState = ReturnType<typeof store.getState>;
 // Inferred type: {posts: PostsState, comments: CommentsState, users:
 // UsersState}
 export type AppDispatch = typeof store.dispatch;
6. Use Redux State and actions
We will now pull the value of our counter from the global data store and manipulate it using the dispatch hook using actions and calling it from buttons. I have explained it using the comments.
 import type { NextPage } from "next";

 // useSelector is used to pull the value from the global store
 // useDispatch is used to dispatch the action we created earlier
 import { useSelector, useDispatch } from "react-redux";

 // These are the actions which we are going to dispatch
 // in order to manipulate the value in the global data layer
 import { decrement, increment } from "../slices/counterSlice";

 // Gives us the correct typings based on how we configured our slices
 import { RootState } from "../app/store";

 const Home: NextPage = () => {
   // We pull the value of count from the global store
   const count = useSelector((state: RootState) => state.counter.value);

   // Create a dispatch hook
   const dispatch = useDispatch();

   return (
     <div className="flex min-h-screen flex-col items-center justify-center">
       <h1 className="p-2">The value of counter is {count}</h1>
       <div>
         <button
           onClick={() => dispatch(increment())}
           className="bg-green-400 p-2 m-1 w-full"
         >
           Increment
         </button>
         <button
           onClick={() => dispatch(decrement())}
           className="bg-red-400 p-2 m-1 w-full"
         >
           Decrement
         </button>
       </div>
     </div>
   );
 };

 export default Home;
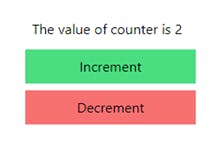
7. Testing our simple counter app
Lets first run our app using the following command
yarn dev
Now lets click on the increment button two times. It should probably look like this
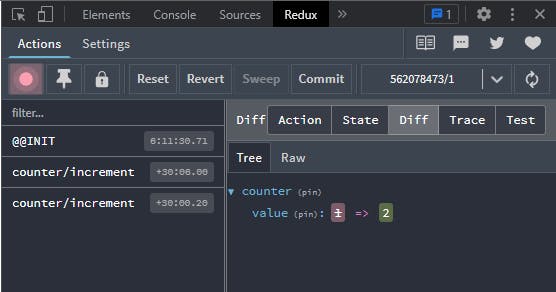
We can also install the Redux DevTools extension from the chrome store (here) and see the different actions getting dispatched and also the difference of the value in the store everytime we dispatch an action.
Conclusion
Quick Summary about what we have learnt.
- Create a Redux store with configureStore
- configureStore accepts a reducer function as a named argument
- configureStore automatically sets up the store with good default settings
- Provide the Redux store to the React application components
- Put a React-Redux component around your
- Pass the Redux store as
- Create a Redux "slice" reducer with createSlice
- Call createSlice with a string name, an initial state, and named reducer functions
- Reducer functions may "mutate" the state using Immer
- Export the generated slice reducer and action creators
- Use the React-Redux useSelector/useDispatch hooks in React components
- Read data from the store with the useSelector hook
- Get the dispatch function with the useDispatch hook, and dispatch actions as needed
That’s how you can integrate Redux with a Next application! You can find the GitHub repository for this project here. I would also encourage you to review the documentation of redux toolkit to learn more about other use cases.
Have a great day!